It only takes a pandemic for me to finish a cross-stitch!
A decade ago in 2010, we first saw this painting of The Tree of Life, "Seen and painted by Hannah Cohoon. City of Peace Monday July 3rd 1854", from The Andrews Collection at Hancock Shaker Village. I was fascinated by the design which felt so balanced and abundant.
The following year, I posted about the cross-stitch version of this painting in their store, but none were in stock. I believe it was around $30 so I wasn't about to buy it anyway. I took this quick photo and then painstakingly mapped my own pattern in Excel, adding a title and contrasting border.
For years, the embroidery hoop only allowed the letters “cock shaker villa” to be shown from the words "Hancock Shaker Village”. It was our nickname for the piece.
Now it is finally complete! I've shared the pattern here. The printable pattern has the standard 10 stitch grid (best viewed at 50% zoom). The only embroidery floss colors I purchased were the greens, brown and blue, listed on the last tab. The light coral and red were taken from left over floss. The cross-stitch fits in a 8.5"x11" frame nicely.
It's nice to finally get these crafting projects done!
I've finally made good use of my craft time and completed this 88-key crochet piano scarf. It's based on this patter from Crochet Spot. It's not exactly the size of a real keyboard, as the keys are a little too wide and too short.
But it does make for a nice conversation piece if you keep the right side out at all times (the back side just has extra black and white crochet stripes).
And you can get this fantastic empow(her) shirt at at our local Indigo Store. RIP RBG.
It's that time of the year for heart-shaped decorations! Here's a heart-shaped wreath covered in crochet flowers made from any scrap yarn with red, pink or purple hues.
Really, I only used scrap yarn for this project! Way too much pink and red yarn in this house... The only thing I purchased was some floral wire that I shaped into a heart by twisting it together, overlapping it 3 times.
For the flowers, I used a variety of free patterns from my fellow crochet artists. The largest flower in the center is Lisa's Rose Crochet Flower Pattern.
Another interesting pattern is Mikey's Crochet Bee Happy Flowers. This is reminiscent of the Crazy Exponential Necklace as it simply triples from row to row. I couldn't make it to the fourth row, but three is plenty. Up close, this flower looks like brain folds!
Attaching the flowers to the wireframe is a little tricky. The first time I tried to assemble them, the flowers would flop to the side and wouldn't stay in the front. I found a technique that worked to keep the flowers steady.
Using a yarn needle, thread one end between the wires so that the flower faces forward. This may be one or two wires depending on where the flower falls on the wire twist. The flower below is threaded under one wire.
Thread one end in between wires on the front side
Tie the flower on the backside of the wireframe. The flower below, shown from the backside, is threaded under two wires. Arrange all the flowers with ties until you are happy with the spacing.
Once all the flowers are positioned, untie each flower and knot it in place. Then wrap one end around all three wires and knot it again. Trim the excess ends. This is how it will look from the backside.
I had a large amount of yellow Super Saver yarn, so I thought, what better project to use it on than a sunflower? I found this pattern online but created it with a few modifications: Amigurumi: Happy Sunflower.
At the end of July last year, we drove through Lee, New Hampshire and passed by this incredible sunflower farm in full bloom. I have never seen so many sunflowers in one place!
The process of creating this amigurumi was a long one. In the middle, it looked like some alien plant had taken over my table.
When I started the assembly, everything looked disproportionate. The head looked way too big and the petals looked too small. So I frogged back the head several rows, which made the eyes look super large, but not too bad. I also didn't have any felt for the eyes so I just sewed them in with embroidery floss. Then I frogged back all the petals to the row with 16 stitches and increased them to 20 stitches before decreasing again. This required attaching new yarn when I ran out of the original. It took forever!
But in the end, I have this happy sunflower to greet me!
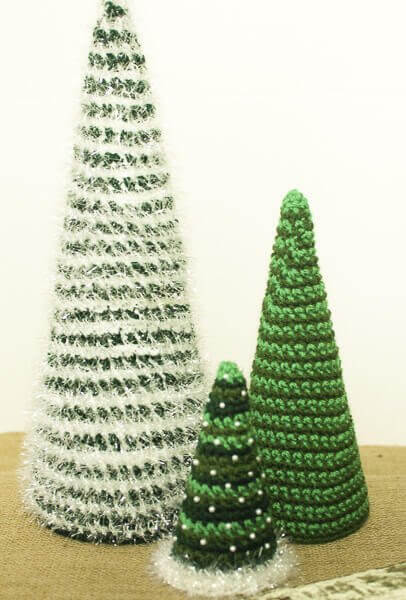
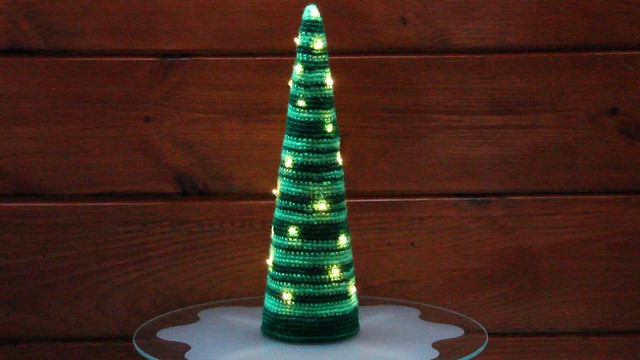
This glowing tree was inspired by Petals to Picot Cone Christmas Tree pattern. Since I already had two shades of green Super Saver yarn and a mini LED light set, it was the perfect project!
This idea started from this ugly knitted tree we saw at Target. I thought I could make a better tree decoration than that!
A quick look around the internet for yarn trees got some "interesting" alternatives. Sure you can just throw yarn onto a cone with some glue, but where's the skill in that?
Here's the one stop shopping list for the materials the lighted crochet tree (Walmart is cheaper for Super Saver yarn and foam core!):
For the pattern, I found that following the Petals to Picot pattern ended up flaring the cone to quickly as well as producing bent lines where the increases were. So after frogging half the project, I modified the pattern to something that fits better and is far more intuitive to keep track of.
Using a size F, 3.75 mm crochet hook, create a magic ring with 4 sc.
In each row, work 1sc into every stitch and 2sc into in a random stitch in the row. Each row will have exactly one stitch more than the previous row.
Alternate yarn color randomly every 1 to 4 rows.
After reaching a few inches in length, check the fit in the styrofoam cone (works best with the plastic wrap on).
If the work starts to flare out, skip the increase on the next row. I found that I had to skip the increase about every 3rd or 4th row.
Keep checking the fit every time you change yarn color, or every other row.
Continue until the piece reaches the bottom of the cone.
How's that for a super simple pattern with no counting! At the bottom, I ended up with 66 stitches in the last row. If you end with a multiple of 6, you can attach the bottom piece stitch for stitch.
For the bottom piece, crochet a simple circle using the same color at the bottom of the cone:
R1: 6sc in magic ring – 6
R2: inc around – 12
R3: (sc, inc) around – 18
R4: (2sc, inc) around – 24
R5: (3sc, inc) around – 30
Continue adding rows with incremental sc's amounts until you reach the same diameter as the cone.
To assemble, use a crochet hook to fish out the tiny LEDs from the inside. Stuff the tip of the cone with polyfill. Carefully fit in the styrofoam cone without dislodging the LEDs. I just kept the plastic wrap on the cone. Join the top and bottom pieces together by crocheting through both pieces with a slip stitch. Having the bottom fit exactly to the cone is one of my favorite parts!
In the daytime, the lights are so small, you can barely see them.
One of the perils of competitive gymnastics is the risk of injury. So far, Dova had broken a finger, and has had various issues with elbows, ankles and feet. This time on a routine back handspring landing, she felt a painful pop in her foot and sat out the rest of practice. After waking up the next morning still in pain, we took her to see a doctor as well as an orthopedist the next day. The x-ray indicated a possible fracture in the growth plate of her heel. Ouch! It definitely looked like one side of her heel bone was sticking out further than it should have.
The tiny AirCast boot she received was so cute, but not so much the crutches. The worst thing she complained was how the rubber underarm pads rubbed against her arms went she wore a short-sleeved shirt. We looked online for some cute crutch pad covers when I made the mistake of saying "I could make better ones than that!" I'm always telling Dova to make use of things that we already have instead of buying new things, so now it was time to put my money where my mouth was, or in this case, save my money like I'm always preaching. I showed her some fleece fabric that I had bought when she was a baby to make a sleeper I never got to. She liked the fabric pattern so we were off.
One thing she wanted was for the cover to be double layer. In my mind I designed or the pattern and by the second one I had it down. Here it is.
You will need two swatches of fabric, each 10"x20", two lengths of 1/4" wide elastic, each 24" long and matching thread. Here's the fabric and elastic for one cover.
Fold the fabric in half crosswise with the wrong side out and sew the far edge. You will have a square.
Next will be the elastic channel on one side. I usually use a chopstick to thread things like elastic and drawstrings. If you don't have one, you can use a knitting needle or something similar. Flip the fabric right side out and place the chopstick inside the fabric along one side of the seam.
Place the fabric with the chopstick into the sewing machine and sew the length of the channel.
Just leave the chopstick in there while you sew. It'll guarantee that your channel will be wide enough to fish out the elastic later and also serve as a guide to make it an even width.
Next, fold the fabric in half again, with the seam side of the channel on the outside (this will be the inside of the final cover).
Place the edge of the fabric into the sewing machine starting below the channel.
Sew down to the crease and curve inwards slightly at the end. Repeat with the other side.
Next will be the channel on the other side. Place the chopstick through the small opening on the free side. Tent up the cover so that you can fit it into the machine. The edges of the channels will be unfinished, which is fine for fleece since it's very forgiving. This approach may still work with regular fabric since the channels will eventually be cinched up.
Sew down the length of the chopstick, making sure that you don't catch any fabric from the other side.
Fish the elastic through one channel.
And then through the other side, making sure not to pull it out the first side.
Cinch up the elastic and tie a bow. Flip the cover inside out and install it on the crutches, tucking the the elastic inside.
Try to tell your gymnast not to do balancing tricks with the crutches! Dova's best story was at school when a teacher escorted her out of the building for a scheduled fire drill before all the other kids. This got Dova really mad, and when she got home she said, "I don't want special treatment because I'm on crutches! I want to be TRAMPLED!" Wow, fiesty one!
On our follow-up visit to the orthopedist, the nurse immediately asked where we bought the crutch pad covers. She was shocked when I said the I made them. She was so enamored that she borrowed them to show another mom. Yes, I made them! Dova is now off her crutches, but it was nice to be famous for two weeks.